TAKKIES AND TULIPS
  • Home
  • About
  • Beauty
  • Fashion
  • Lifestyle
  • Contact
HI MY BUDS🎕

I HOPE YOU ARE ALL DOING WELL AND HAVING AN AMAZING START TO THIS NEW WEEK.

So for the Month Of August I have decided that every Tuesday I will be posting. This week's post is all about reading. 📚

I am a writer and reader By heart. I absolutely love the way I can live all these different stories I read. I usually play them out in my head as stories progress but I can honestly say that I do get very demotivated to read, I'm either tired, busy or just not in the mood. And then I have alot of books that go to waste.

So for myself I have created a few ways I'm order to make sure that I can read my books completely and successfully. Also reaching reading goals that I set out for myself.

NUMBER 1 - ORGANIZATION


I used to just have my books all over, that way I definitely never used to read them as often, also they would get really damaged or even the risk of getting damaged.

So I create a space to organize my books. I have a bookshelf, which you don't need. Even if you have desk space or even space in your cupboard where your books can fit neatly.

This way I also know every book I have in my collection and I feel like I'm setting goals for myself knowing that they are right there and I feel less guilty knowing I'm getting through all my books. Especially if they are apart of a book series I love reading them all order and having all the books in the collection.

P.S. I keep all my unread books in a different section so I know which ones I haven't read. So I can build up the eagerness to read them as well.

NUMBER 2 - READING SPACE


This was a tough one. I can easily get in my bed and read ten pages no problem, but that's when I didn't work full time. Or I didn't have my weekends full spending time with my family or writing articles.

I now create a reading space. Even if it's just a chair in the corner of your room, or sitting on top of your blankets on your bed and setting a reminder to read even 3 pages.
I even love to sit in our back yard, around my dogs and sit in the sun with a new book, or even re reading some of my favourites.

As Long as it's a space where you won't be too distracted and it takes away from the story or your commitment to your book. But also a place where you are calm and can enjoy your book for as long as possible. It's all about you reading your favourite genre and having a blast. It also doesn't make it feel like it's forced or even like homework. But more so like a calm, peaceful, and serene part of your week or day that you've been waiting for.

NUMBER 3 - READING APPS


This might seem like a 'Lazy Option'. I for one think it's pretty genius, and I will tell you why. We are in a huge digital day and age. Where we are all connected somehow to technology and what is easier and more efficient than having all your favourite books all in one place. Also SPACE SAVER!!

It's a great way to also make it easier in your everyday life if you really want to read a book and have no space for either a hard copy. Or feel it's better at night. Also having a device in your hand will make you not want to fall asleep and damaging your device. Also it's easier all around if you are more technological.

My big sister recently introduced me to an APP called ANY BOOKS 


This is a free app that only requires either a WIFI OR DATA source. Which is so efficient.
All you have to do is either log in with your Facebook or EMAIL account.


You have access to thousands of books from all your favourite authors. You may even purchase books online, which means that the Authors will also be benefitting from you using this APP.
For me the best part is, this app is so accessible especially with me that is quite busy, it reminds me daily to slow down read a few pages. And live each story I read.

It is broken down in genres and new releases. It will even suggest to you high rating books of the week and top picks from your favourites genres which you apply when you first sign up to use the app.

You can find it in your APP store. I will also link it right here. ANYBOOKS


The best part about this app it shows you how many pages you've read and how many you have left you feel quite accomplished when you flip the pages (which you actually swipe through) and see how much progress you've made. You can also easily delete or even re download. Another thing is it doesn't take up much space.

ANYBOOKS is a lifesaver App.


My sister uses this app for her kids and they enjoy all the books they ca and read on their tablets. It also gives them a keen sense to pick up more books that watch movies or play games. And it really creates a unique rhythm if you'd like to start reading more but don't have time to go to the bookstores or cant really afford to buy them at that particular moment, some books have really become expensive.


So if you are in the mood to read a good book, go ahead and try these 3 tips and I promise you will love it. 

The best way to live your life, is to maybe imagine you in a few more. What can hurt when youre a princess for 3 hours. 

ALL MY LOVE 
KEESHA OF TAKKIES&TULIPS 

Share
Tweet
Pin
Share
No comments
POWDER POWER
 
Good Day my Buds 🎕

Let's catch up a little bit.

As we all know I do work full time besides having my blog and moving my blog over has been a wee bit of a challenge but it's okay.

We will make it work. I hope all my beautiful readers are doing okay and are having some amazing times to create good memories. I know that in the past few months I've spent a lot of time with my family and close friends and it's needed. But I've also had a lot of reflection and quiet time. Time that I didn't know I needed but actually I did. Times of silence really can help you come back to yourself and who you are. And also remind you never to give up on any dreams you've had and to keep pushing. ❤️


So, as you know I have got combination skin and setting my face is severely tricky. I either look like a ghost or my makeup doesn't last more than four hours before it starts melting off my face (not literally LOL) and the natural oils in my skin tend to peek through and allow my makeup to either oxidise or disappear during the day.


I didn't know how to use powder and how well it worked until I tried it for myself. Like many woman I didn't want my skin or my makeup to look super dry, pasty or have any flashback in my pictures. I then learned that it's not only your setting or finishing powder that can do this it's the entire way your makeup is applied. This is just an extra step to lock in your colour and style cost effectively and it's a done deal. 

Let's get into it. 


Different types of powder

  • Translucent loose setting Powder – This is a clear powder that sets your foundation and concealer without altering any of the colour, if it does contain silica it might cause flashback so I use the YARDLEY ABSOLUTE TRANDSLUCENT POWDER, and it works for any skin type and like a dream.
  • Pigmented loose setting powder – This is a loose setting powder with a tint, with this powder you may chose the colour that suits your skin tone, this is an everyday powder and you can even use it as a powder foundation if applied correctly.
  • Translucent pressed powder – This is the same as translucent loose powder just compressed and it doesn’t mess as much. Also, the molecules are a bit finer so it can be used to set best under the eyes and highlight points
  • Pigmented pressed powder – This is the same as pigmented loose powder, although it used more as eyeshadows and bronzers as well.
  • Bronzing powder – So your foundation is your first layer, which you even out your skin, bronzer is then used to warm up the face and give it a bit more dimension.

WHY WE USE POWDER?


  • I can definitely tell you why I use it, I use it especially with liquid foundations to set it, especially in summer, your foundation is not like glue so it wont stay on after it dries, it might slide around your face, there fore making your makeup look blotchy and uneven I don’t think any body wants that.
  • Also, it sets cream products very well, and it makes your makeup last longer through out the day.
  • It makes your makeup look seamless
  • It allows the rest of your powder products you put over be more vibrant, pigmented and extends your makeup wear over all.


WHEN TO USE POWDER?
  • I use powder to set my foundation and concealer
  • I use powder to bake my highlight if I am going for a sculpted look
  • I use powder to bronze my face after I’ve set my makeup

Things you don’t do with powder!!!

  • Do not use any liquid products over your powder, it might make take it off or even cause your powder to clump up.
  • Do not use too much powder or else your face might have too much access you won’t be able to get off, or you might end up looking like a ghost.
  • Do not bake with pressed powders they will cause creasing; it is made to set only.
  • Do not use a loose powder as eyeshadow you will have a lot of fallout. 

A few handy TIPS AND TRICKS 😎
  • You can use powder with a damp makeup sponge
  • You can use translucent powder to set your concealer under your brow bone and on your eyelid
  • You can use Bronzer as an eyeshadow
  • You can even use yellow powders under your eyes to brighten it up.
MY FAVOURITE POWDERS 

  • YARDLEY ABSOLUTE TRANSLUCENT POWDER YARDLEY ABSOLUTE
  • MAYBELLINE FIT ME PRESSED POWDER IN 330/ 350 MAYBELLINE 
  • MAYBELLINE PRESSED POWDER IN CARAMEL 
All available at dischem, clicks and Takealot 


But most of all.

ENJOY trying out new things, powder can dry out your skin so if you have dry skin, use much less, but also If you have oily skin it wont keep it at bay all day so be mindful to use other products in conjunction with your powder to keep your skin oil free for longer. Lastly enjoy the process of figuring it out, also last tip. YOU CAN FINISH your makeup with SETTING SPRAY!!

ALL MY LOVE 
KEESHA OF TAKKIES&TULIPS 🧡
Share
Tweet
Pin
Share
No comments
Blogging and Beauty on a Budget. 💃

Good Day my Loves and happy WEDNESDAY

Today we review the WET N WILD FACE Collection and I cannot be more excited.


I hope you are all doing well and that no matter what, please remember how brave, kind and honourable you are. NEVER let anyone or anything get in your way of being the best version of yourself you can be, also don't let anyone tell you who you are or who you should be!!!


So as you know I am very fussy and meticulous when it comes to a good foundation, there's so many different reasons we as woman wear it. I wear for my skin to seem a bit more even as it is, while still allowing my natural features to peak through like my beauty spots and freckles, then I also want days where my face is completely matte with full coverage and a hint of OLD school glam.

The foundation

With this new formula it's quick drying and the cover is amazing I started off really taking a look at the outside and I was so impressed with the packaging they provided. The foundation comes in a glass bottle with a black hard plastic lid with a spatula attached it's amazing for using little to no or quit a bit of product also it's a step you can skip if you don't want to use your fingers or any other tool like a brush or a beauty blender


Wet n wild concealer 

Okay so here is where I might get a bit wild this concealer might be my be favourite and I am gonna tell you why it's got a plastic packaging case all round with a brush attached for easy and precise application but it looks so so elegant and the finish is one for the books we will get back into that a bit later 


Wet n wild Setting Spray 

For the longest time I have been using rose water to set my face and now I'm learning to try new things especially in summer when we want our faces to look glossy and not dry and pale. This packaging is completely plastic with white and Grey all around and black writing but when I say I've been using this setting spray for aost three months and the bottle doesn't even feel like I used it once yup the spray attachment is honestly the best I've used it evenly distributes the product no problem and really sets your face to a Dewy consistency. 


How I picked my colour


Well at first I went for caramel and I applied it to the bottom of my cheek blending into my neck and I nearly fell over the undertone was way too auburn and I didn't feel like it fit me very well it is possible that it could be a great winter shade because it's only off by a little bit but I didn't want to take a chance so I went for the shade I have now (toffee pecan) and I do not have any complaints 

I took the foundation on my arm and then went and tried concealer shades that were just a shade off from my shade because I didn't want very light coverage under my eyes I wanted it to look absolutely natural and I love how these two products worked together 

My experience 

So going into this I've had high hopes because so many bloggers and you tubers I follow have had nothing but a good experience, but when I tell you how amazed I was please understand that this brand is no joke they really did it for their face portion of their makeup line 

The foundation applies brilliantly with either a brush or a sponge I feel like with a brush I don't lose much product but I do get streaks so I use a beauty blender afterwards and my naked skin looks airbrushed.


When applying the concealer I realized wow this product is no joke with pigmentation so a little goes a long way as well as it dries so quickly I'm needing to either blend really fast or do one eye at a time and highlight there after it's creamy and so easy to blend I've even been able to just wear the concealer alone on days when my skin looks extra tired and it just becomes one with my skin and I look awake and ready to go 


How much I bought it for 

Well will you believe me if I told you I got these 4 products for about R200. 00 Nope me neither 

But I did I bought it over the December period with the huge Christmas special and I got R12 off each product which means these products are so reasonably priced and do affordable and easy to apply even if you're a first time makeup wearer.

So this is no hit to your budget and its a really great way to have a drugstore product make your skin look naturally airbrushed and Takkies&Tulips is here for it. 


So my final thoughts I give this BRAND a 9/10 only because it took me so long to get it and like 3 tries to apply it correctly other than that I suggest that any lady who is looking to up their makeup game in a real way and save money should Definitely get this and Please let me know what you this as well. Do not be scared to try new things newexperiencess will elevate your life.

ALL MY LOVE
TAKKIES&TULIPS


Share
Tweet
Pin
Share
No comments
Blogging and Beauty on a Budget.


ESSENCE CHRISTMAS CAMPAIGN MAKEUP REVIEW


Good Day all my Amazing Readers
So how have all of you been doing? Did you enjoy my First Series instalment?


Please let me know of any feedback you may have for me you know I am open to ideas 😊
So, for this instalment I would like to start Reviews, may be with brands, or palettes even snacks. I guess you will just have to read and see 😊


SOOOO Essence is one of my all-time favourite brands, and I have a lot of reasons why, they are inexpensive, their products are good, (well 90% of the products I have tried), they are easily accessible and have something for everybody. A few no no’s is they don’t have a wide range for darker skin tones, they do have darkening drops but I hope they will start launching products with more options for ladies from all over the world, embracing all kinds of skin tones. I wouldnt mind if they even started a Skin Care range. They have a real great number of products, some which are not available in South Africa Yet, but one set that was, was their Christmas Campaign/Limited Edition Launch AND I BOUGHT IT!!!!!!!!!!!!!!!!!!!!

Being a makeup fanatic, I have been obsessed with finding new cute products, that I can add to my collection and have them for a long time. And this set was a major deal, its my first Launch that I have bought which relates entirely to a season, as Christmas being my favourite season of the year, timing could not be any more perfect then when it was right then.

Let’s Start 🏃

The Entire Range

In all honesty I just stumbled upon this Christmas range at Dischem and thought I would check out the esssence Facebook page to see if I could find the Products, turns out it Launched at the end of november and I got my Hands on 3/4 products that were available.
the Range consists of a

  • Highlighter Brush with Mini Candy Canes inside
  • A Single Highlighter (I didnt purchase it cause it was too light for me) 
  • An Eyeshadow Palette 
  • A Stampy nail art kit 
  • A Ornament ball lip gloss 


Here is a screenshot of the range, I have still seen the Stampy nail art kit available but didn't purchase it either I prefer my nails pretty plain for the most part. 


What I Purchased


These are the 3 items that immediately caught my eye so i took it as fast as I realised what it was, I see on ESSENCE UK site how many amazing Palettes and Gadgets they have got so when I see an item has finally reached our shores, YUP I am riding that boat no problem.

The overall cost of these items was Under R300.00 and for me that's a bargain because they are surely a collectors item especially the Brush its so nifty and cute. Really Suits the holidays and I have not stopped using it since. 


My Experience

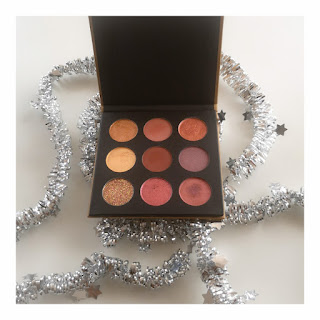
This eyeshadow palette for right now is one of my favourites, its so pigmented and easy to blend. There are a total of  9 Shades 3 Matte Shades, 5 glossy/light shimmer shades and 1 loose Glitter shade. I loved how with one palette you can create sof or heavy looks and building these eyeshadows were so easy. My favourite is the left bottom corner its like a glitter multi coloured tinsel and I AM HERE FOR IT!! 


The Highlighter brush is really dense and fluffy it makes it easy to use an easy to clean its such a breeze when the product can always work with you and in this case I give this BRUSH a 10 and an Extra 5 for being the cutest brush in my collection.

The Lipgloss ball is just wow CUTE!!!! Although I don't find myself reaching for it very often, it does give a cute tint to the lip but it can be a fuss to carry around. The formula is creamy and not overwhelming at all  


Favourite Look I created with the Christmas Range


SO if you have seen my posts on social media you would see this look all over it, I created the look for my Close Friend Kariens wedding and it went off like a freaking bomb, I used all 3 Matte shades then blended the bottom two burgundy shades and then took the lighted shade and added it to my lid and then I took the GLITTER or ALLLLL GLITTERS and I put it in my tear duct. YUP!!!!

For all my other face details please head to my Instagram @takkiesandtulips.


OVER ALL I love Christmas and I loved that this was an early Christmas gift to myself so far I am not disappointed with my purchase, and I hope it will inspire you to maybe make your own new looks using colours you have never tried before.

HAPPY WEDNESDAY LADIES and hers to every wednesday of February being our new meeting Spot.

Til next week

ALL MY LOVE
TAKKIES&TULIPS  


Share
Tweet
Pin
Share
No comments
Blogging and Beauty on a Budget.


So, after all our skin care, did you think it was over???


NEVER. Skincare was preparation for this next stage of face week, Primer, colour correction & foundation

Let’s start with this, we all love makeup to look good and natural and not cakey. I for one hate it when makeup looks like you can chip it off like paint. I love that makeup can be versatile for both light wear and heavy wear but either way the way you treat your skin will be the reason your makeup either looks good or not the way you wanted it too. Another thing, before we get into this please don’t be discouraged, we all have methods that work for us, and that’s great, this is just one of the many ways I have mastered my makeup to suit my skin needs and my mood.

PRIMER – WHAT IS IT AND WHY SHOULD YOU USE IT?


If you a bit about painting a house or even your nails, you know that priming is big step, it’s the first step after your moisturizer that will make your skin adapt to the products you’re about to put on your skin.

Primer is the product that now can smooth your skin out. Let’s see what different kinds there are and method you can use.

  1. Pore minimizing - It will not magically shrink your pores but it will minimize the look or your pores by filling them in and smoothing out the surface of your skin
  2. Brightening – it will give your skin a brightening effect, the formula is designed to remove the dullness from your skin and will keep your skin from looking dull and flushed to rosy and bright.
  3. Sweat proof, blurring and SPF approved – this kind of primer is designed to extend makeup wear for a longer period of time, its created so that when you apply your face makeup to stay on and not stray. Also provides extra protection for when you sweat on those hot summer days and yes you can sunburn with makeup on and an SPF is perfect especially for day events. (Be careful wearing SPF at night if your taking pictures with a flash, it will create flashback).
  4. Primer Spray – Rose water is one great primer alternative and its so affordable, you just put it in a tight spray bottle and apply to your naked skin as you would your setting spray. It creates a tacky finish which also allows your makeup to dry a bit faster when applied. There is also a bunch of other prime sprays that do as well offer the same benefits and so far, I hear nothing but good things because they are so hydrating as well.


Primer is an important step because it’s the difference between your makeup sliding off, oxidising quickly and your skin texture just peaking out. And us ladies who get zits, or have acne it’s a great way to also save your skin. Primer is also a protective layer between your skin and your makeup, it saves your pores from getting blocked and it can help your skin if products may be too harsh that it also doesn’t give you a rash or worse burn or tint your skin. It’s a great affordable way to also make sure the time and effort you put into your skin care doesn’t get lost when you apply your makeup.

Current PRIMER favourites


  1. LA Girl Pro PREP HD Smoothing face Primer – It retails for R69.00 and it’s my one top favourite
  2. ESSENCE – Beauty angels colour correcting & You better work Gym Proof Primer – Both retail from R60 – R80.00 I use them together and apart
  3. ROSE WATER – Natures nourishment plain rose water can be used as a toner as well


CONCEALER & COLOUR CORRECTION


Because I myself have really struggled with colour correction because of my pigmentation problems, I have found a way to determine which colour you need for which problems or concerns and how to use them.

You will see I have attached a little colour correction template in which you can use to determine what which colour corrector to use for which skin condition or problem, I have tried to cover and research each to help as much as possible please let me know how it goes for you and if it was helpful?


With colour correction you need to first chose if you would like to use a cream base, powder base or even certain primers can be used to colour correct.

With a cream base like the LA girl Pro concealer and the Essence colour corrector tin, will be a full coverage application on the areas needed, which you can apply over your primer and under your foundation. You can blend it in using the end of a normal beauty blender, the mini beauty blenders or even a concealer brush. Please blend like you would foundation do not leave any streaks or lines but also do not blend the colour away because that’s exactly what you need to make It correct any problems.

My personal experience

I have noticed I can use a peach corrector that’s not too orange or too red, because my skin has a yellow undertone so in order for my foundation to be silk on my skin and still keeping its perfect shade and not have the concealer peak through, I use a mixture of the LA girl Orange corrector and the LA girl yellow corrector. This I apply after my primer

I lightly start under my eyes, my chin and any dark spots I may have, if its red pimples or marks I use a green corrector and I blend it out as referenced above. The main thing about concealers is not to be scared to try it, it’s a cost-efficient way to have even skin and beautiful makeup application all in one and it’s only going to be cakey if you didn’t take the time to blend it out.

Application after my foundation


This step is mainly for highlighting, or just enhancing places where you might have dark marks or even because you didn’t need to or want to colour correct (which please you don’t have to do it every time) I apply a thin layer of a shade 2 shades lighter than my skin tone. I have also attached a picture to show you in all the various places you most likely highlight, well where I do.


After you have applied your concealer blend it out as you would your foundation and set with your favourite setting powder. You need to set your highlight or it will just bleed and you wont notice or realise you’ve highlighted in any case.

FAVOURITES

  1. LA GIRL PRO CONCEALER – R69.00 EACH
  2. ESSENSE BLUR STICK – R45.00
  3. ESSENCE COMPACT CONCEALER – R65.00 FOR (3-5 SHADES)
  4. WET N WILD CONCEALER – R45.00 I BOUGHT IT ON SPECIAL AT CLICKS


FOUNDATION – LETS APPLY IT LIKE BUTTER   


So this is one you know I've been researching for the longest time, if you go further on into my blog you will see I did an entire 'how to' with foundation also how to pick your correct shade and undertone. 

So this part of the series is actually just to show you how your foundation works with the correct primer and colour correction. It's also a bit of guide on how you can apply makeup for different finishes and textures 


  • The thing you need to determine is your look, and I'd you're going for a dewy natural look you can use a combination of the brightening primer with a pink corrector for added brightness, a good foundation for dewy looks are the Yardley oatmeal foundations and a touch of the LA illuminating foundation. 
  • If you're going for a matte look with sharp finishes I suggest you use any or even a combination of corrector with an HD or sweat proof primer for maximum hold, Colour pay off and protection through out the day, a good foundation suggestion is the Maybelline Fit me pore-less and matte foundation or the new foundation I've been using the wet n wild photo focus finish foundation. 

In addition to these combinations for full coverage always use a stipling or flat edge foundation brush and for a dewy more natural finish to use a makeup sponge. 

When blending make sure you blend into your hairline and under your jawline it creates a even coating and keeps your skin looking even even away from your face.


Tips when applying foundation, if you want your to foundation to dry faster wet your beauty sponge with setting spray or rose water and your results will be so much more different, if your using a brush and you get a few streak lines you can smooth it out with a sponge aswell if you would like to look air brushed. 

Ladies last but not least have some fun and always be kind to your skin, if you wear makeup every day take extra care even get a CC or BB cream and make sure to exfoliate once a week. 


Foundation Favourites


  1. MAYBELLINE FIT ME FOUNDATION - R100. 00
  2. WET N WILD PHOTO FOCUS - R60. 00 BOUGHT IT ON SPECIAL AT CLICKS 
  3. YARDLEY OATMEAL FOUNDATION - R80. 00
  4. LA GIRL ILLUMINATING FOUNDATION - R179. 00


LADIES ALL YOU NEED TO BE IS CONFIDENT AND PROUD OF THE SKIN YOU'RE IN. ALSO WEARING MAKEUP SHOULD BE FUN AND SURPRISING AND LEARNING IS SOMETHING THAT COMES WITH EVERY NEW PRODUCT. YOU CAN SO DON'T EVER BE 
SHY. YOU CAN DO IT.

ALL MY LOVE 
TAKKIES&TULIPS 🥀

@takkies&tulips


Share
Tweet
Pin
Share
No comments
Older Posts

SUBSCRIBE

Subscribe to Takkies And Tulips by Email

ABOUT ME

Hi there!

I'm Keesha Mcpherson a mixed masala South African aspiring writer and occasional tomboy with a slight sneaker fetish and I’m the blogger behind Takkies and Tulips.

I will be taking you on a journey through all my DIY tips and tricks of the trade, fashion flops and fixes as well as lifestyle changes and advice.

I'm an enforcer of inward beauty, acceptance and love, and since I am a low-budget, good product and great results kind of individual, you can expect nothing less on this blog.

Welcome!

Follow Me

  • Instagram
  • Pinterest

Labels

  • Beauty
  • Fashion
  • Lifestyle

recent posts

Find me on Pinterest

Sponsor

Blog Archive

  • August 2019 (2)
  • February 2019 (2)
  • January 2019 (3)
  • October 2018 (1)
  • August 2018 (7)
  • May 2018 (1)
  • April 2018 (2)
  • March 2018 (3)
  • February 2018 (2)
  • January 2018 (1)
  • December 2017 (2)
  • November 2017 (1)
  • October 2017 (2)
  • September 2017 (1)
  • August 2017 (2)
  • June 2017 (4)
FOLLOW ME @INSTAGRAM

Created with by BeautyTemplates| Distributed By Gooyaabi Templates